


While using your Camplux water heater, you may encounter several problems like your heater not turning on or going out frequently.
But, most often you may discover that your heater is failing to produce hot water or sometimes it supplies you with too hot water. Also, you may find your heater is leaking from the bottom or producing a yellow flame.

However, whatever the issues you are facing with your Camplux water heater, you can instantly fix them just by going through our comprehensive Camplux water heater troubleshooting guide. So, let’s start…
01. Water Heater Not Turning On
Suddenly your Camplux water heater won’t start or ignite, which is one of the major problems that you may face. In addition, your heater will not make any audible clicks during startup when it fails to turn on.
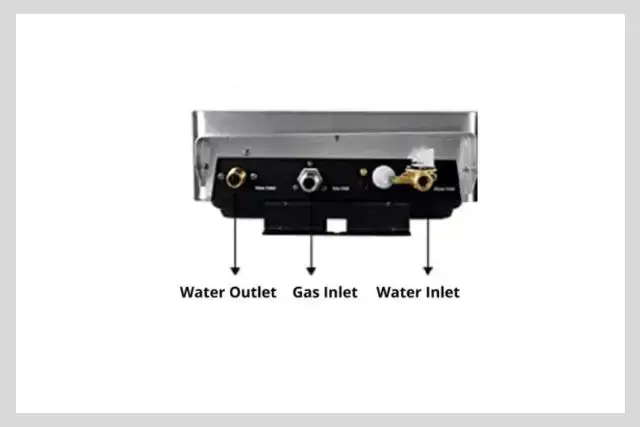
However, your tankless water heater mostly stops working due to the reversed incoming and outgoing water. Again when the water inlet, outlet, and gas inlet are connected with the wrong pipes, your heater stops turning on.
Sometimes, you may find that your heater’s water is incoming and outgoing correctly. And the water/gas inlets are connected to the correct pipe. But still, your heater is not starting. Then the following are the culprits to blame:
- Damaged and incorrectly installed batteries in the wrong position.
- Inadequate water pressure or the water pressure is below 2.5 PSI.
- Dirt or debris builds up on the water inlet filter screen.
- Gas and air contamination in the fuel tank or defective gas valve.
For all these above factors, your heater stops functioning. But sometimes after starting the operation your heater can refuse to ignite for some more factors. And those causes are the stuck gas solenoid, gas knob, and water knob’s incorrect setting, etc.
In addition to these, the other culprits that hinder your heater’s lighting are a clogged shower hose, faulty water sensor, and lousy wiring fuse.
Solution:
First, check your Camplux heater’s incoming water and make sure it is on your heater’s right side. The incoming water should be on the far right side of your heater. In contrast; the outgoing water should be on the left of your heater.
Also, physically check the water inlet, outlet, and gas inlet’s connection to the pipes. And ensure they are correctly connected. If needed, change the pipe connection. Now follow the ways below and ensure your heater turns on perfectly.
- Replace the damaged batteries and install the new batteries in the correct position
- Ensure your heater is getting adequate water pressure. The minimum sufficient water pressure is the 2.5 PSI
- Properly clean the water inlet pipe’s dirt build-up and the filthy filter screen
- Using the shower head switch perform the on-and-off cycle in your heater. It will help to purge the air from the gas.
However, your heater still refuses to start or ignite after following all these above solutions. Now we recommend you check the gas knob and water knob settings. Correctly set these knobs and clean the stuck gas solenoid.
Also, clean the shower head clog. If your heater is still not working, you must inspect and replace the faulty water sensor, and fuse’s bad wiring.
02. Heater Keeps Shutting Off
Whenever you turn on your water heater to get hot water, your heater’s bad components trigger the unit to shut down. Thus another problem that the users often face is that this Camplux water heater won’t stay lit.

A bent, damaged, or dirty thermocouple or defective thermostat is the major culprit which causes your heater’s frequent turning off. Also, the heating coil issue, mineral deposits in the tank’s bottom, dirty pilot light, and improperly installed vents force your heater to shut off.
Moreover, your heater refuses to work continuously due to the empty fuel tank, low gas pressure, improperly installed batteries, etc.
Besides these above, many more factors hinder your heater’s continuous operation. Some of them are:
- Gas sensor wire’s loose connection or disconnection
- Air and gas contamination in the gas cylinder due to zero or low gas
- Bent or too close ignition system to the burner
- Too high or too low thermopile size fails to complete the circuit
- Faulty gas sensor
Solution:
When you find your Camplux water heater keeps going out, we recommend you turn off your heater’s water supply for 1 second. And then turn on the water supply again.
Then the first thing you must do is to check and replace the damaged, or bad thermocouple or lousy heating coil. Also, inspect your heater’s faulty thermostat, malfunctioning gas sensor, and defective igniting system and replace them if required.
Secondly, clean the tank’s sediment and mineral deposit build-up. Also, ensure you properly install the vents. Then clean the ducts and ensure proper air supply to your heater.
Moreover, a consistent gas supply is crucial for your heater’s continuous operation. Thus check and refill the empty gas tank and ensure an adequate gas supply.
After doing all these above, is your heater still shutting off? Now it’s time to check the water pressure. If the 12/18/120 volt pump you are using for your heater, the approximate sustained water pressure should be 35-65 PSI. Thus check your heater’s volt pump and ensure enough water pressure.
However, when all these above fixing ways fail to settle your heater shutting off trouble, you should follow the other solutions below:
- Using the shower head switch perform the on-and-off cycle to purge the air from the gas.
- Tighten the gas sensor wire’s connection
- Make sure your heater’s thermopile is a perfect size (It’s not too high or low)
- For ignition spark, install new or fresh batteries in your heater. Also, ensure the battery’s proper polarity (+/-).
03. Heater Water Issues
Your Camplux water heater’s main job is to produce and supply hot water.
But when your heater begins to malfunction, you may discover that:
- The heater can’t produce hot water.
- Or producing but not hot enough.
- And supplying you with too hot water.
- Heater ignites with a loud noise
However, below we will explain the causes and solutions to your heater’s water-related troubles. So, let’s check….
i) The Water Is Not Hot Enough
The first water-related hitch that you can go through is that your heater runs for an hour.

But your heater doesn’t produce enough hot water due to the unit’s internal malfunction. However, for the following factors, your heater can stop producing enough hot water.
- Using your water heater above the elevation of 6,000 feet
- Gas regulator malfunction
- Too low-temperature settings
- Closed or partially opened gas valve
Solution:
The specialty of your Camplux water heater is that you have to operate it below 6000 feet elevation to get enough hot water. So to settle the above difficulties, we recommend you use your water heater below the 6,000 feet elevation.
Now it’s time to check the gas regulator for damage and replace the bad one. Then check and increase the temperature setting if it is low. Finally, inspect the gas valve and open it fully. And hopefully, your heater will start producing enough hot water again.
ii) Heater Producing Too-Hot Water
Another fact is that your Camplux heater may suddenly start producing too much hot water. Using extremely hot water is not possible.

Thus, it’s also a major problem. The causes leading to this trouble are:
- Setting the too-high temperature
- The heater is partially heating a tiny amount of water
- Clogged water filter
- Closed or partially opened water shut-off valve
Solution:
When your tankless water heater starts producing too hot water first, we recommend you check and reduce your heater’s temperature setting. Then you must fully open the shut-off valve and ensure more water flow.
Again, water filter blockage greatly causes too much hot water in your heater. Thus using a toothbrush cleans the water filter’s dirt and debris build-up.
iii) Heater Is Not Producing Any Hot Water
Your Camplux water heater’s failure to produce enough hot water is a problem we already told you about.
But another major hitch is that your heater stops producing hot water or supplies only cold water. However, your heater’s water is flowing, but there is no hot water coming from your heater.
The prime reason you get cold water from your heater is the partially opened or closed water shut-off valve.
Also, the closed hot water faucet can cause this trouble. Some more factors for which your heater refuses to produce hot water are:
- The heater’s electricity is on, but no water supply
- Malfunctioning mixing valve
- The heater’s switch is off
- Setting the too-low temperature
- Inadequate water pressure or insufficient gas supply
Solution:
To solve your heater’s no-hot water difficulty, you must first inspect your heater’s shut-off valve and ensure it is fully open. Then check and completely open the hot water faucet.
However, after doing all these, if still, your heater is not supplying hot water, then do the following to settle down the above hitches:
- Ensure that your heater is getting sufficient electricity and water supply
- Using the remote control’s button, turn on your water heater unit
- Increase your heater’s temperature
- Replace the defective mixing valve
iiii) Heater ignites with a loud noise
- Kindly restart the water heater few times to exhaust the extra air inside. If does not fix the problem try to replace the gas regulator using a standard grill regulator
- Check if the screws are properly secured if the water heater is mounted
- Check the battery if it’s still okay
04. Heater Yellow Flame
While your Camplux water heater is functioning normally, it will produce a deep blue flame. But when your heater produces a yellow flame, you can’t overlook it as it is another problem.
Yellow flame causes extreme smoking and dirt build-up in the flue tubes, combustion chamber, and gas burner. However, the root reasons behind your heater’s yellow flame are:
- Cracked gas regulator
- A dirty burner or clogged main burner
- Insufficient air circulation and improper ventilation in your heater
- Blocked vent or flue system
Solution:
On your Camplux water heater’s front cover, you will see the middle horizontal window or viewer panels. Look through the window to check whether your heater produces a blue or yellow flame.
We strongly recommend you not to use your Camplux water heater when it produces a yellow flame. First, fix the flame’s issue and then use it. However, the resolving ways to the above difficulties are:
- Replace the cracked gas regulator
- From the gas burner’s top, remove the scale and adequately clean the burner and unclog the main burner
- Ensure sufficient air circulation and proper ventilation in your heater
- Clean the pipes properly and remove the vent or flue’s blockage
05. Water Heater Leaking
Another trouble with your Camplux water heater that sounds uncommon but really happens is that it leaks. A Camplux heater being tankless does not necessarily mean that it will not leak. In fact, this heater can leak from the bottom and cause endless difficulty for you.

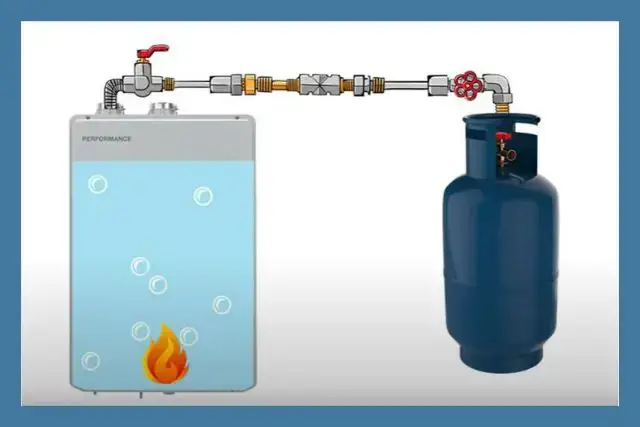
Your heater’s improper installation is the prime reason for which your heater develops leaks. Here you can check the image below for the correct installation.

Also, another factor is the hot water fills the empty space by creating steam. And it creates high water pressure on your heater, and thus leak develops in the unit.
Apart from these two factors, there are more causes for which you can experience a leak in your tankless heater. Those are:
- Loose pipes connection or cracked heater
- Defective T & P (Temperature & Pressure) relief valve
- Lousy, leaking, or closed drain valve
- Damaged or loose gaskets
- The malfunctioning cold and hot inlet and outlet
Solution:
Usually, users believe that their heater is tankless and will not leak as the tank doesn’t come with this unit. But the reality is your Camplux heater leaks. However, even if your heater leaks, you must first ensure that the unit is installed properly.
Secondly, make sure that your heater does not produce extremely hot water to reduce the high pressure. Also, to prevent your Camplux heater’s leaking go with the following solutions:
- Check and tighten your water tank’s pipe connection.
- Replace the cracked heater, malfunctioning T & P relief valve, loose or damaged gaskets, lousy drain valve, and the defective hot and cold water inlet and outlet.
06. Camplux Water Heater Error Codes
Displaying error codes on your Camplux water heater’s screen means your heater is giving you the fault indication. The common error codes that your heater may display are E0, E1, E2, E3, E5, E7, & Eb.

| Error Code | Error Meaning | Causes | Solutions |
| E0 | Hot water sensor not working | Short circuit. Loose junction pat. A defective or broken sensor. | Prevent your heater’s overheating to avoid short circuits. Tighten the junction pat. Replace the broken or faulty sensor. |
| E1 | Failed ignition system | Loose junction pat. Close or partially open gas valve. Close water shut-off valve. | Tighten the junction pat. Check and open the gas and water shutoff valve fully. |
| E2 | Flame Failure Protection | The heater fails to detect the flame. The gas supply is off. Empty tank or low fuel supply. Damaged fuel sensor. | Ensure your water heater is perfectly detecting the flame. Check and turn on the gas supply. Refill the fuel tank and ensure proper fuel supply. Replace the faulty fuel sensor. |
| E3 | Overheating protection | Overheating controller. Dry combustion. | Ensure your heater controller is not overheating. |
| E5 | Pressure switch failure | Too low power supply voltage. Motor malfunction. | Ensure high power supply voltage. Replace the bad motor. |
| E7 | Solenoid Valve | Valve’s open circuit. Valve’s short circuit. Faulty or disconnected valve. | Prevent the valve’s opening and short circuit. Replace the lousy valve. Make sure the valve is properly connected. |
| Eb | Residual Fire Failure | Solenoid issue. Malfunctioning PCB controller. | Replace the faulty PCB controller. And fix the solenoid issues. |
However, your heater’s types of error codes, code meanings, causes, and solutions are well-explained in the following table. Thus go through the table below:
How To Clear Camplux Hot Water Heater Error Codes
When your Camplux water heater displays an error code, you can follow the ways below to clear it from your heater’s screen.
- Close your heater’s hot water faucet and turn off the remote control’s switch
- Wait 5 minutes and then turn on the switch again
- Now open your heater’s hot water faucet
After following these steps, if the error code still appears on your heater, you should repeat these phases 2-3 times.
07. Heater Black Smoke
Your Camplux heater uses smokeless fuels such as gas, propane, etc. So, the black smoke on your water heater means something other than gas is burning. Usually, the dirt or debris build-up on the burner causes your heater’s black smoke.
Solution:
If your Camplux water heater produces a little sooty and black smoke, you must clean the burner’s dirt and debris build-up. Also, adjust the burner sleeve near your water heater’s gas valve to fix this trouble.
Following the steps below will most likely fix your heater’s black smoke hitch:
Step 1: Open your water heater’s front panel. Now use an air compressor to air blow the unit’s heat exchanger. Blowing the air will help to blow the clog or debris.
Step 2: Set the water knob to the maximum and the gas knob to the minimum. Then turn on your heater and check whether the unit is still producing black smoke or not.
Step 3: If black smoke still comes from your heater, you should unplug your heater’s gas line. Stop using your heater until you resolve this issue.
08. Replace And Clean Components Inside
Burner
First, pull out the wires of ignition needle and sensor needle. Second, unscrew and take off the flame shield. Third, unscrew the part connecting the burner and gas water valve, burner and inner shell and clean out the dust. Before putting back the panel, ensure that all parts are connected, especially the O-ring seal. For your safety, please use soapy water test on connection between burner and gas water valve, then operate the machine on lowest flame and highest flame. This will help you check for gas leak.
Thermostat
Pull out the wires on the thermostat, and unscrew the thermostat. The new thermostat should be good contact with the inner shell and remember to insert the wires back on it.
Gas Water Valve
Unscrew the gas water valve with a wrench and a phillips screwdriver;
Then unscrew the ground wire and disconnect all the terminals between ignition box and other parts. Before putting back the panel, please ensure that all parts are connected, especially the ground wire. For your safety, please use soapy water test on connection between burner and gas water valve, then operate the machine on lowest flame and highest flame. This will help you check the gas leak.
Clean the heating plate on the heat exchanger. When the exchanger is no longer working, it needs replacement. Before you cover the panel, use soapy water test for gas leakage.
Ignition Box
First, pull out the wires of ignition needle and sensor needle. Then unscrew the ground wire and disconnect all the terminals between ignition box and other parts. Last, unscrew the ignition box. After replacement, remember the ground wire must to be connected back.
So, hopefully, the above Camplux water heater troubleshooting guide was helpful for you.And from now on you can fix your heater’s issues by yourself.
If you have any further queries about your Camplux water heater,please contact us.
Tel: +1(844)-538-7475
Email: support@camplux.com